5 Things to Know - AudioStar Pro

The GSI AudioStar Pro™ has several CDs installed that are commonly used in speech testing for a variety of diagnostic purposes. Basic Auditory Tests (Adult and Child) and Basic Auditory Tests II have several Spondee lists for speech reception testing and lists for speech discrimination that include PBK-50s, W-22s, and NU-6s. Also included are the AZBio Sentence and Pediatric Sentence Tests, the DOD VA CDs, and the Spanish Speech Lists. All licensed and installed at the factory and ready for use the first time you turn it on. One benefit of using the internal speech files is not having to worry about calibrating the test with the VU meter with the 1000Hz calibration tone prior to testing. The calibration for each word list has been set internally, so simply pull up the list you want to use, and set your transducer (phones, inserts, or bone) intensity and routing and you are good to go. To use internal speech files in the sound field, each CD must be calibrated individually to determine the proper correction factors to apply and can be done during install or during an annual calibration. While the built-in lists cast a wide net for basic diagnostic speech testing, there are plenty of other word lists, test batteries, and CDs available that audiologists are using daily. If you would like to add a word list that does not currently exist on your AudioStar Pro, you can contact your equipment distributor and arrange to have them added to your audiometer.
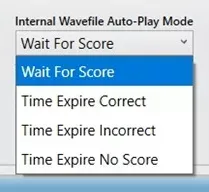
The AutoPlay function on the AudioStar Pro defines how the internal .wav files are presented during speech testing when the interrupt button is engaged. Using an AutoPlay function can save time in testing and help streamline workflow. By default, the AutoPlay is set to Wait For Score. In this condition the device will play the first word or recorded stimulus and wait for the audiologist to score it correct or incorrect based on the patient response. Once it is scored the device will present the next word and as each word is scored you move through the test easily. There are a few other conditions that can be selected from the AudioStar Pro Config App (companion software tool for device configuration) that include Time Expire Correct, Time Expire Incorrect, and Time Expire No Score:
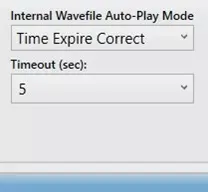
For these Time Expire options you select the behavior and how long the device will wait between presentations. So, in the above example, if we set it to Time Expire Correct with a timeout of 5 seconds and engage the Interrupt button, the device will play the first presentation in the list, wait 5 seconds, mark it correct, and move on to the next presentation. If the patient gives an incorrect response, the audiologist can manually override the automatic correct result to incorrect by pressing the incorrect button before the next presentation is complete. Time Expire Incorrect works the same, but defaults to Incorrect instead of Correct. ‘Time Expire No Score’ just plays the words one after another, follows the timeout rules, but does not score the words.
*Pro Tip: While the behavior of the AutoPlay must be defined by the Config App, changes in the ‘timeout’ length between presentaions can be adjusted on the fly by accessing the Word Nav menu item form the bottom ribbon menu on the speech screen:

The integrated QuickSIN and BKB-SIN tests make setting up and executing a speech in noise test possible in minutes. You can access either test by pressing the MORE button on the front panel and when selected the device will set the audiometer up for testing.

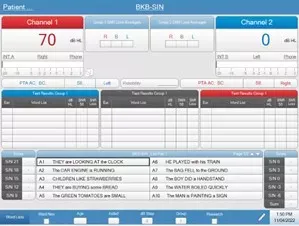
For these tests, the AutoPlay feature that is available for routine speech testing will not work due to the number of ‘target’ words that need to be scored for each presentation. To complete testing, you can use either a mouse connected to the AudioStar Pro or the navigation pad on the AudioStar Pro front panel to select and play the sentences. After the presentation of each sentence, the audiometer will automatically score all target words correct and the audiologist can use the Incorrect button on the audiometer to adjust if the patient makes any errors. So, for example, in QuickSIN there are 5 target words for each presentation. Say the patient only correctly repeated 3 of those words, we would then press the Incorrect button twice, so it shows a 3 before we move on to the next sentence. After all the sentences are scored, press store and the Audiometer automatically scores the test, assigns a SNR loss, and displays the results of various testing conditions. The QuickSIN is appropriate for most adults, while the BKB-SIN is normed for children and adults (age 5 and up) and written at a 1st grade reading level. This is also ideal for patients with memory loss issues.
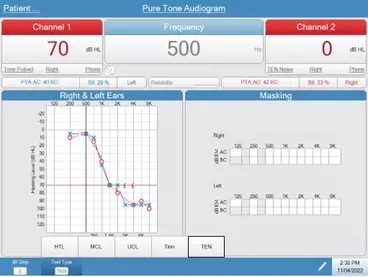
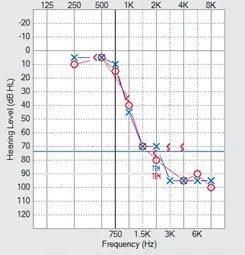
The TEN test, or Threshold Equalizing Noise test, is a clinical test that can detect the presence of one or more cochlear dead regions in an ear. This can be useful for counseling about the benefit of hearing aids, hearing aid selection, or cochlear implant candidacy. Cochlear dead regions should be suspected with moderately severe to profound loss (HL thresholds 70 dBHL or more), in steeply sloping HF hearing loss (loss of more than 50db/ octave), or with low frequency hearing loss with normal or mild high frequency thresholds. Patients will often report distortion and have poor word recognition scores. When the TEN test is selected under ‘Test Type’ on the bottom ribbon menu in Tone screen, the audiometer sets up the proper routing and stimulus to get started with testing. The procedure for determining thresholds in the TEN test is identical to the manual pure tone audiometry except that a 2 dB step size should be used for maximum accuracy. When a threshold is obtained during the TEN test, the audiogram with be marked with an appropriately colored TEN:
Full instructions on the TEN test can be found in the user manual.
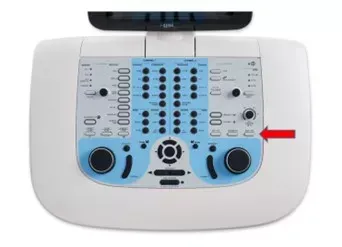
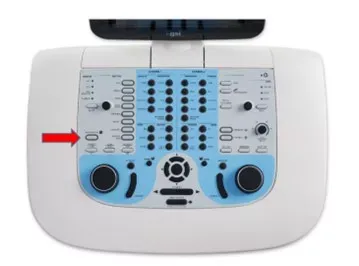
When you are working with children, it goes without saying that time is of the essence, and you need to be ready to move fast and be efficient. Fortunately, the AudioStar Pro is here to help. There are several key features with AudioStar Pro that are essential for pediatric testing, beginning with the built-in VRA trigger. AudioStar Pro’s built between 2012 and 2019 will have Left and Right triggers on the control panel just above the intensity dial for channel 2. Newer AudioStar Pro units will have a dedicated Center button along with the Left and Right in the same position. Both configurations of AudioStar Pro are compatible with the most popular VRA systems on the market.
Pro Tip: On older AudioStar Pro units you can press Left and Right together to trigger the Center with most VRA systems.
The dedicated assistant monitor allows direct communication between the audiologist in the control room and the assistant working with the patient in the testing suite. Test stimulus, like tones, and speech are delivered to the assistant headset mirroring what the audiologist hears with the mic/monitor headset. All of this is critical for conditioned play audiometry and effectively working as a team with difficult to test patient populations.
Pediatric Noise is frequency-specific stimulus that is calibrated and can be used to obtain thresholds. While it sounds somewhat like a narrow band noise, the slope is much sharper and more akin to a frequency modulated tone (warble):

You can access the Pediatric Noise very quickly from the signal modification menu:
Lastly, with the newer AudioStar Pro units (built after 2019) you can route the mic or external stimulus (EXT A /B) to the opposite channel while testing tones. This makes it easy to have something like soothing music going in Channel 2 from an external source, like a CD player or PC, while testing in Channel 1 that you can go to quickly if the patient starts to get fussy to help bring them back to task.
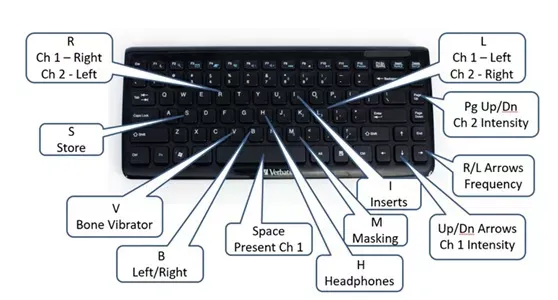
As much as we love the assistant monitor, not every audiologist has an assistant that can step in and help with something like CPA. The remote keyboard lets an audiologist run the audiometer while working directly with the patient in the testing suite. The straightforward and familiar short cut keys make it easy to navigate testing effectively and efficiently.
Pro Tip: There is an HDMI output on the back of all AudioStar Pro units, and if you hook up a monitor to it you will see a mirror of the AudioStar Pro interface. Consider mounting a monitor in the testing suite behind the patient so that you can see it while working with them, but they can’t. That way you can see more clearly where you are with remote keyboard as you control the audiometer and perform testing.
Follow the link to learn more about the AudioStar Pro.