Pure Tone Audiometry
Audiometry Guides
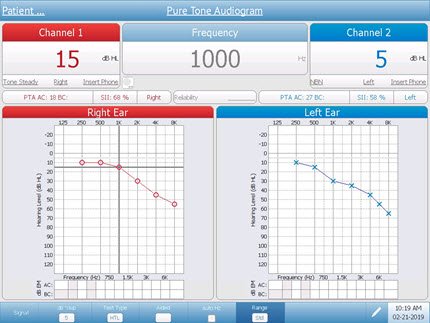
An audiometry test evaluates the patient's hearing thresholds, or the quietest levels that the patient is able to hear low to high frequency tones. During pure tone audiometry testing, sounds are presented to the patients ears, and the tester records the lowest decibel level that the patient is able to hear each frequency. The results are then used to determine what type and degree of hearing loss the patient has, and if further testing or treatment (such as hearing aids) are needed.
Noise Recovery Period
Exposure to high levels of sound - unmuffled lawn mowers, many power tools, motorcycles, rock music, gunfire - tends to create a temporary threshold shift (TTS) which diminishes with time after exposure.
Any patient tested soon after such exposure will manifest a hearing loss that does not accurately reflect the normal hearing threshold. It is important that the testing procedure prescribe some time interval, usually 16 hours, between the high level sound exposure and the actual hearing test
Instructing the Patient
Try to put the patient at ease before beginning the procedure. Explain to the patient:
- How the test will be administered.
- What he or she should be listening for; explain that the sounds may be different; some may be soft, some loud.
- That they will wear earphones.
The purpose of the test is to find the softest tone which can be heard and it is important to listen carefully. Explain that he or she should respond by raising a finger or hand, or by pressing the handswitch, as soon as the tone is heard. As soon as the tone is no longer heard, the finger/hand should be lowered or the handswitch should be released. Inform the patient that each ear will be tested separately, unless otherwise instructed.
Placement of the Earphones
Prior to positioning the earphones on the patient’s head, inspect the ear canals for any blockage due to cerumen or foreign objects. Recognize that soft-walled ear canals may collapse under the earphones and this may lead to incorrect threshold levels. Insert phones might be used in these cases. Eliminate all obstructions, such as glasses, hair, or hearing aid, between the earphone and the patient.
Center the earphone over both ears and adjust the headband so that it rests solidly on the crown of the head and exerts pressure on both ears. Place the earphone with the red connector over the patient’s right ear and the earphone with the blue connector over the left ear.
Patient Familiarization
Select the proper output transducer routing to the desired ear. Demonstrate the 1000 Hz tone at 40 dB HL (or at a level estimated to evoke a prompt and clear response) to the patient. The tone duration should be between one and two seconds. Set the Channel 1 attenuator to -10 dB.
Practice: beginning with the tone continuously on, gradually increase the intensity by rotating the Channel 1 attenuator until a response occurs. Switch the tone off for at least 2 seconds, then present the tone again at the same level. If there is a second response, proceed with a threshold measurement. If the second response does not occur, repeat this step.
Threshold Determination (Pure Tone): Modified Hughson-Westlake
The level of the first presentation should be 10 dB below the level at which the patient responded during the familiarization session. Present the tone for a period of one to two seconds. The time between presentations can be varied, but should not be shorter than the test tone itself. After each failure to respond to the signal, the level is increased by 5 dB until the first response is given. After the response, the intensity is decreased 10 dB and another ascending process is begun.
The threshold is considered to be the minimum intensity setting at which a response has occurred two out of three times at a single level. Record this setting by pressing the Save pushbutton or by making a notation on an audiogram form.
Test Procedure
Conduct the pure tone test on the better ear first. Repeat the sections on Patient Familiarization and Threshold Determination for each tone setting in the following order: 1000 Hz, 2000 Hz, 4000 Hz, 8000 Hz. Retest 1000 Hz followed by 500 Hz and 250 Hz. If there is a difference of 20 dB or greater between octaves, test the interoctave frequencies, i.e. 750 Hz, 1500 Hz, 3000 Hz, and 6000 Hz. Record these settings by pressing the Save pushbutton with each threshold level. Repeat this procedure with the other ear.
Determine if masking should be used. The use of masking in the contralateral ear (non-test ear) is indicated if there is a difference in threshold between the two ears of approximately 35 dB or more. If necessary, repeat the testing with masking and again record the testing process.

Placement of the Insert Phone
If insert phones are used, push the correctly sized eartip onto the earphone and then place the insert phone securely into the patient’s ear. When using the paired E•A•R insert phones, follow the manufacturer’s recommended procedure for eartip placement and insertion.
Placement of the Bone Vibrator
The bone vibrator may be placed on the promontory of the mastoid process or on the forehead, whichever has been selected for calibration.